Tuesday 7 March 2017
Evaluation Part 4
How did you use media technologies in the construction and research, planning and evaluation stages?
There were a variety of media technologies that I used to help me produce my music video.
In the planning stage I found inspiration for my music video from watching other music videos on youtube. I watched videos from artists in a similar genre to what I wanted to produce. This helped me get inspired and learn key elements that make up a music video. I then storyboarded what i wanted my music video to look like. After I had came up with a narrative and drawn this, I scanned this into a computer. This helped me sync up the shots to the music. After this I made the storyboard into an animatic. I edited and put this together on Final Cut Pro. This helped me get a vision of what my music video would look like and what types of shots I would use.
When constructing my music video I used a DSLR camera, lighting, white screens and Final Cut Pro to put my video together. I used the DSLR camera to take a variety of different shots in different angles such as close ups and mid shots of the performers.I used lighting to improve the light in the rooms I was filming as the natural light had a yellowish tint to it.
To edit my footage together I used Final Cut Pro. I used a variety of different effects to help achieve my desired psychedelic and VHS look to my video. This would have been very hard to do without the technology final cut offers.
For the evaluation I have used different technologies such as DSLR camera's to record a green screen analysis to answer one of the questions. I have also used powerpoint and microsoft word. Using different technologies helps make the evaluation more visually pleasing and varied.
Track listing Progress
 Here is the progress on my tracklsiting. I have edited the image to create a psychedelic effect. I have also added a bar code as this is conventional for digipaks. I will add the track listing and publishing info to the track listing back panel
Digipak Panel

Here is the fourth digipak panel. This panel shows the artist in a different setting to the other ones.I used the same editing techniques as throughout the whole digipak to keep the theme constant.
Track listing Panel

This is the track listing back panel for my digipak. This panel shows the consumer the name of the songs, the publisher of the music and a bar code. The font is again the same as the one used throughout the digipak and it is the same font as the band logos. I edited the image on the back cover so that it created a distorted and out of focus on the image but also keeping its clarity. The colour scheme of the digipak flows through this panel keeping it all consistent.
Digipak Panels

This is an additional panel on my digipak. I kept the colour theme constant throughout the digipak and used the same effects. The font is also the same as the one seen throughout the digipak. This panel is to indicate that this panel features the lyric booklet.
Digipak Panels

Here is the 3rd panel of my digipak. This panel is inspired by the artwork of Andy Warhol. To achieve this effect I made the images negative and adjusted the colours. I made the photos into a collage. This is to show the audience the band in some 'natural' poses.
Monday 6 March 2017
Props

Here a number of the props used within my music video. These are instruments typical for my artists and are commonly scene in the grunge rock genre. I have used close up shots of these instruments with my music video to show the being played. All of the performers in my music video each actually play these instruments in real life. This helped when capturing the performance of the video as they all actually learnt the song on their instrument.


Evaluation Part 1
Evaluation Part 1: " In What Ways Does Your Media Product Use, Develop or Challenge Forms and Conventions of Real Media Products? "
Music videos have many conventions that can change from different music genres. However, most music videos follow the theory laid out by Goodwin and include some sort of narrative. Other key conventions of music videos are close ups of the artist whilst lip syncing, footage in sync with the music and the narrative relating to the lyrics.
I researched into many videos from my artists genre, grunge rock, until I had found the key elements commonly seen in grunge music videos. What I noticed was that most of these music videos were very performance heavy. This inspired me to create music video that was performance heavy but included lots of visual on screen effects. Also as grunge was prominent in the 90's I wanted my video to have a VHS inspired look to it.
I began to brainstorm ideas and start planning for my music video. I decided on a colourful, psychedelic and raw looking style for my video. The way that my video challenges toucan music video conventions is that it focuses more on the bands performance and heavy use of editing rather than a big story like narrative. However performance based videos are conventional for bands in the rock genre.
My music video starts of with a shot of a turntable needle being placed on a spinning vinyl record that I shot. This conforms to the conventions of real media products as it is a use of intertexualtiy referencing a scene from Tarantino's movie Death Proof. This shot also suggests the video will have a 'vintage' look to it due to vinyl being an old way of listening to music. As my video progresses and the singing comes in I used a number of close ups to show the main performer singing in time and in sync the lyrics of the song. This is a convention shot seen in many music videos. I also used a number of different types of shots to film the other band members playing their instruments. I shot a close up of the drums being played and adding them into the video so that they synced up with the beat of the song and matched the drum fills.
After the bridge of the song you see the whole band come together into one room. This is again a conventional music video feature. This was used to keep the flow of the music video progressing and not to become boring by seeing the same shots over again. I filmed the band in a small room to give the performance an intimate look to it to replicate what it would be like seeing the band live in a small venue.
Seen throughout the video is quick shots of items commonly associated with rock and roll such as guitars, leather jackets and boots, jewellery, alcohol and recording studios. This helped the music video have some sort of narrative to it and to show an audience what a typical day in the life of a rockstar might include.
The music video features heavy usage of effects found in final cut pro. These effects include prism, negative, colour correction, bad tv and projector. All of these effects when used together can give you a very raw VHS look to it matching the aesthetic of the band. The colour correction allowed me to manipulate the colours of the footage to help my achieve my desired vibrant look.
Analysis Plan
Final evaluation of my media coursework for my music video-evaluations
1) In what ways doe your media product use, develop or challenge forms and conventions of real media products?
2) How effective is the combination of your main product and ancillary texts?
3) What have you learned from your audience feedback?
4) How did you use media technologies in the construction and research, planning and evaluation stages?
2) How effective is the combination of your main product and ancillary texts?
3) What have you learned from your audience feedback?
4) How did you use media technologies in the construction and research, planning and evaluation stages?
Front Cover


On the right is the final cover for my digipak and on the left is the original photograph.
The original image is from a painting my friend done and he allowed me to use the image for the my cover. I heavily edited the image to create a visually psychedelic cover. I edited the colours so that they fitted the colour scheme of my digipak. I done this through experimenting with different effects on photoshop such as flipping the negativity of the image and changing the hue and saturation of the image. I added a background to the image that I created on photoshop from a luck experiment. To get this background I cropped out the background of one of my artists photos and began to experiment with how I could manipulate the image simply out of procrastinating. The result was an image that fitted as the background for the front cover perfectly.
Photo Editing

This is an example of how I plan to edit the photos for my digipak. I have experimented with different effects on photoshop to come up with a psychedelic look. I made the image a negative first and applied different colour filters until I found something I liked. From the photo my favourite part is the way Dom's shadow looks due to the effects which makes the shadow appear in two different colours. I will use these effects throughout my digipak keep a constant colour theme throughout.
Font
After doing some research into different typographies, I decided to use this font:

I decided on this font I liked the psychedelic look it had to it. The font catches your eye and it bold and stands out. I also like the roughness to the font which makes it look almost like it is hand draw matching the raw feel that the band capture within their music. This will match up with the manipulated images on my digipak which will also have a eye catching psychedelic feel to them.

I decided on this font I liked the psychedelic look it had to it. The font catches your eye and it bold and stands out. I also like the roughness to the font which makes it look almost like it is hand draw matching the raw feel that the band capture within their music. This will match up with the manipulated images on my digipak which will also have a eye catching psychedelic feel to them.
Costumes

For the costumes for my artist I was inspired by the look of 90s grunge bands. This style included band t shirts, flannel shirts, funky shirts and jeans (sometimes ripped)
To make the artist appear my real I changed the outfits in the photoshoot so that they would differ to the outfits seen in the music video. I feel that the aesthetic of the digipak and music is complimented by the outfits and it helps give the whole package a genuine feel.

Artist Photos


Here are two photos from the photoshoot of my artist. These images will appear on the digipak and on the magazine advert. I used a brick wall for the background and setting for the images as this is a setting often used by rock bands. The inspiration comes from The Ramones's debut album cover artwork seen below:

I used natural lighting for the images as it was a bright sunny day when the photoshoot took place. I am happy with how the images turn out and I will not need to re shoot as I have a variety of good images I can use for my product from the shoot.
Thursday 2 March 2017
CD Disks

Here are the CD disks to go along with my digipak. These disks feature a segment of the album cover along with the same typography as seen on the cover. They are labeled CD 1 & 2 along with 'album' and 'studio extras'. The studio extras disk is a bonus feature to the digipak which will be a dvd showing the making of the album.
The disks have the same colour scheme which match the rest of the digipak. The disks will slot into the casing of the digipak.
Tuesday 28 February 2017
Other Effects
Other effects I used when editing my music video was an effect called 'Keyer'. This effect enable to layer images on top of each other but cutting certain parts of the footage out showing the footage underneath. This achieved a psychedelic look as it gave a look of lots of different footage being morphed into one.
Here were the settings for the effect:
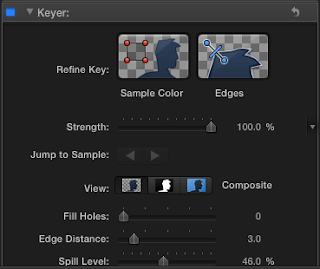
After this effect, along with the other effects I have added to my footage, this effect was achieved:
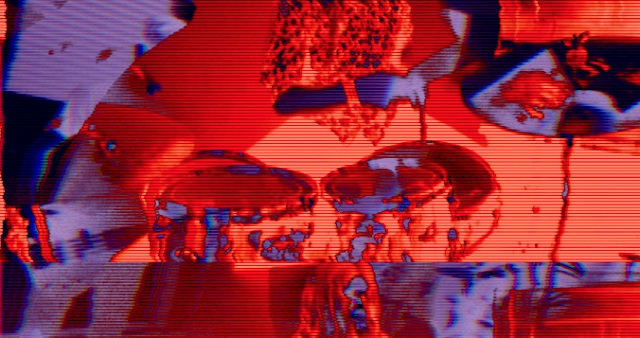
As you can see, it is a very 'trippy' effect. I am happy with this as it creates a weird illusion of footage being overlapped and entwined together.
Here were the settings for the effect:

After this effect, along with the other effects I have added to my footage, this effect was achieved:

As you can see, it is a very 'trippy' effect. I am happy with this as it creates a weird illusion of footage being overlapped and entwined together.
Layering Effects
To achieve my psychedelic effect I knew I would have to experiment with different effects.
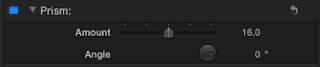
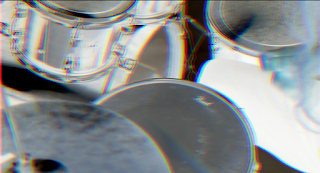
The first effect I found that helped achieve my desired look was called 'prism'. This effect created an almost 3d like to the image.
Below is a before and after of the effect being added on to the footage:
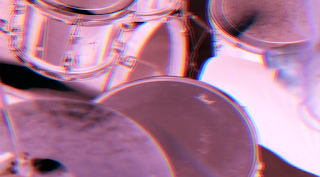
The next effect I added was 'negative'. This effect inverted the colours of the footage. This made for a visually pleasing effect that appeared 'psychedelic', below is a screenshot of the effect and the settings:

Next, I wanted to make the colour of the footage appear a little more psychedelic as it was just black and white shades before. To achieve this I used colour correction. This enabled me to change the colour of the footage to be more colourful and vibrant.
Below is after I added the effect:
The final effect I added was called 'Bad TV'. This effect gave the footage a VHS look to it which I liked as my artist is inspired by bands from the 90's, a time when VHS was very popular. This effect gave the footage a 'raw' look to it and made it more grainy without loosing clarity.
Below is a screenshot of the effect after it was added to the footage: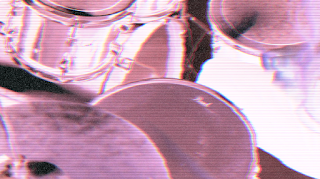
The first effect I found that helped achieve my desired look was called 'prism'. This effect created an almost 3d like to the image.
Below is a before and after of the effect being added on to the footage:


The next effect I added was 'negative'. This effect inverted the colours of the footage. This made for a visually pleasing effect that appeared 'psychedelic', below is a screenshot of the effect and the settings:


Next, I wanted to make the colour of the footage appear a little more psychedelic as it was just black and white shades before. To achieve this I used colour correction. This enabled me to change the colour of the footage to be more colourful and vibrant.
Below is after I added the effect:

The final effect I added was called 'Bad TV'. This effect gave the footage a VHS look to it which I liked as my artist is inspired by bands from the 90's, a time when VHS was very popular. This effect gave the footage a 'raw' look to it and made it more grainy without loosing clarity.
Below is a screenshot of the effect after it was added to the footage:

Music Video First Draft
Here is the first draft of my music video. I will soon be screening to this to my class and receiving feedback on the ways I can improve my music video.
Production Log

Today I filmed the whole band performance for my music video. I set up the bands equipment in the corner of a music rehearsal studio where the walls were all white. I had help from my friend with filming some hand held footage. The rest of the footage was filmed with the camera on a tripod. A number of different shots such as a canted angle were used when filming.
I am very happy with how the scene came out and will not need to re film this.
Below are some screenshots of the footage:


Production Log

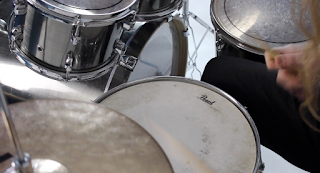
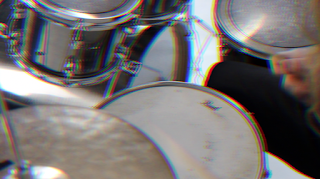
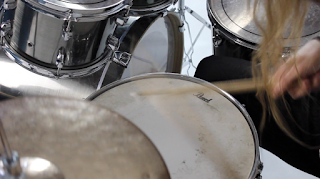
Today I filmed Tom playing the drums for my music video. After watching many music videos from the my chosen genre I noticed a receptive shot used for filming drummers in music videos. This was a shot where the camera is placed over the drummers shoulder giving an over view of the drum kit. I also placed the camera in different areas around the kit on a tripod to get close up shots of the performance that will be synced up along to the music video. I also got a mid shot of the performance to show all of the drums and Tom in the same shot.
I will edit this footage later to achieve my desired psychedelic look.
Below are some screenshots of my footage.


Production Log

Today I filmed the scene where Dom is playing bass guitar. I encountered some problems when filming this scene. The first was position Dom in front of the screen. When filming I had to make sure there was no unwanted background surroundings scene in the footage. To overcome this I had to take my time when filming free hand and when positioning the camera on a tripod I would have to make sure only the white background could be seen. The other problem was getting Dom to 'act' and move around when filming. I wanted Dom to move along to the music as it is conventional for rock performers to move around a lot on stage and in music videos.

Here is a screenshot of my footage from today. I am happy with the footage and will not need to film this scene again.
Production Log

Today I shot the first performance scene of my music video. I filmed myself singing along to the song against a white screen. I had help filming from my friend so that I could get some free hand footage which was not filmed on a tripod. I am happy with how the footage came out and I will not need to re shoot this scene.

Here is a screenshot of the footage. I will edit this footage to achieve a psychedelic look. This will be done be experimenting with different effects on Final Cut Pro.


Magazine Advert Adjustments

Here is the adjusted version of my magazine advert. After receiving feedback on my advert it was agreed that the placement of the text on the advert was in the wrong places and looked slightly messy. To correct these errors I placed the text in different places until I found a spot where it looked the most professional. I placed the text in the top right hand corner as this is where the eyes naturally gravitate on the poster.
Thursday 23 February 2017
Digipak Adjustments

Here is an update on my digipak. The adjustments I have made are I have flipped the top 3 panels upside down so that when they fold together they are the right way up. Also previously some of my images were slightly stretched and distorted. I have also added the spines to the digipak to give it a professional look.
Tuesday 10 January 2017
Music Video First Draft Feedback

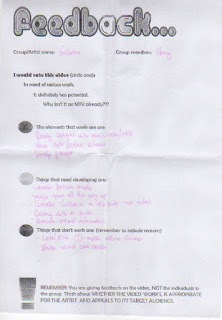
Here is the feedback for my music video first draft. People liked my editing style and the psychedelic visuals. I have learnt that I need to develop my narrative as it was lacking much of a plot in my first draft. I will improve on this by working out a way of making the narrative more clear for an audience through brainstorming ideas.
Digipak and Magazine Advert Review

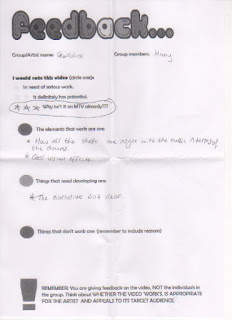
Here is the review of my digipak and magazine advert. I will take this feedback into consideration and will apply it when I am re-editing digipak and magazine advert,
I received lots of constructive criticism such as I needed to make my narrative more clear. I will follow this criticism so that my video has a narrative easy for an audience to follow.
Thursday 5 January 2017
Filming Log


Here is the first performance footage that I filmed. I used a white screen background to make the drum performance looked like it was filmed in plain white room as this would give me a good start for my editing. I used a camera on a tripod to allow my to place the camera in a number of different ways to give different shots of the drums being played. I will improve on this by re shooting some of this free hand.
Above are the screenshots before and after some editing. These are just basic edits that helped me get to grips with the way I want to edit my music video and achieve a psychedelic and VHS look to the music video.
Subscribe to:
Posts (Atom)